Showing posts with label Modelling. Show all posts

11 May 2016

Learning to the Max!

If I want to fulfill my ambition of becoming a game designer, at some point I'll need to buckle down and learn 3ds Max. Today, I made the most of Digital Tutors by spending most of my afternoon powering through a tutorial on the basics of the software.


The process begun with the creation of a spline, which was then turned into a piece of 3D geometry. The fillet tool was used on some of the sharper corners to make them desirably rounder. These elements were then duplicated and attached with the bridge tool.


Separate polygon shapes were created, modified and positioned to represent the buttons and joystick. The screen face was duplicated and hidden, before a more shapely screen was put in place. 


The duplicated object was unhidden and positioned to act as a piece of glass - which would later be altered with mental ray materials. 


At this stage, the UV unwrapping could begin. All of the processes so far have been fairly similar to that of Autodesk Maya, so it hasn't been too difficult to follow through. I had so far followed the tutorial very closely, so I decided to use the texturing stage as a chance to make the model my own. As 'Spyro the Dragon' is my childhood favourite, I chose an array of images to use in my Photoshop file.
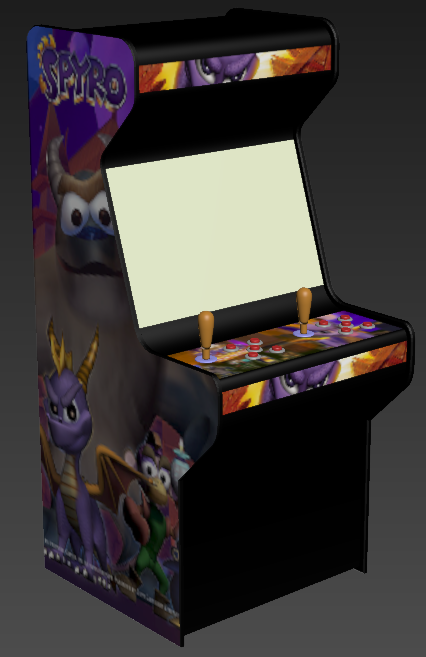


Using the material editor, I created several different plastics for the buttons, joysticks and rims which were individually altered to be either matte or glossy with varying colours. The backplate was input into the settings for the initial render:


I was pretty happy with the progress at this stage, but there were still changes that needed to be made. To begin with, the output ratio for the render was set to 1280x720 and use of the safeframes allowed me to reposition the object to fill the frame.

A skylight was created with a HDR spherical map input to gain better control of the scene's lighting. However, this was still very dark, so the lighting was ramped. A polygon plane was inserted to act as the ground, allowing a shadow to be placed.


I'm feeling pretty happy about my progress so far, so I am aiming to work towards building my knowledge every day through the use of Digital Tutors and YouTube tutorials until I feel comfortable enough to try my own projects.

10 February 2016

Let's start a band!

This week we were signed up to digital tutors, giving me access to a plethora of video tutorials for a animation software. As I have an interest in becoming a 3D generalist, I have created a playlist full of interesting tutorials for Maya, Mudbox and 3DS Max to learn watch over the next year.

I have started off with a tutorial for modelling an electric guitar in Maya, which I am hoping to complete over the next two weeks in my free time. The whole tutorial lasts over 18 hours, but this is my progress so far after approximately an hour and a half:


8 May 2015

Modelling Progression

With the end of this semester edging closer, I have been working hard on the remaining assignments; background painting, motion studies, the sound project, camera projection mapping and the group collaboration to create a title sequence.

Between working on paintings, I have taken some time to practice modelling in Autodesk Maya. I found a range of blueprints online for various game, film and television characters. I decided to model a Dalek as the design didn't look too complex. (Famous last words...)


Although incomplete, the model looks pretty good so far. I will probably work on this Dalek at a later date as I enjoyed modelling it.

8 February 2015

Feelin' Handy

During the end-of-semester break I decided to practice modelling in Maya. I worked on multiple models over the two weeks, but the most progress was made to this basic hand.


The process was easier than anticipated - taking only a few hours to get the model to it's current stage. As I have a keen interest in photo realism, I'd like to learn how to create and apply bump and displacement maps to add a skin-like texture.

4 February 2015

Raygun: Mark II - Design and Modelling

In college I completed a module which required me to create the conceptual idea for an indie game. I designed an environment, weapon and character for said game, which were later modelled in Autodesk Maya.


My design for the object: a raygun.

As this was my first time working in Maya, I was quite proud of my final model. However, I recently found the original file and realised that my modelling skills were limited to translating random polygon shapes into position. I also had no knowledge of texturing, so the model was coloured with various blinn materials. 


Raygun: Mark I consisted of over 70,000 polygon faces.

As I now have a better understanding of both modelling and texturing, I have decided to recreate the model from scratch. The new poly count consists of 1,342 faces and was completely created from the extrusions of a polygon sphere.


I feel that the initial colour scheme is quite overwhelming and works better in 2D than 3D. An acquaintance told me that the model could be a good design for the game 'Team Fortress 2', so this may have an impact when deciding upon the model's new colour scheme. 

An example to show the red and blue colour schemes in Team Fortress 2.

15 January 2015

Remy's Retopology

Prior to retopology, the Remy model consisted of over 9 million polygon faces and it was crucial that the density of the mesh was lowered for later rendering and animating.

I found myself starting the process from scratch multiple times due to the edge flow looking inconsistent, which was particularly noticeable on the face. I overcame this by deleting half of the model and then mirroring the geometry in order to achieve symmetry.


The Remy model after retopology.
The new model is made up of 1,528 faces and can be easily manipulated in Maya without the software freezing up. 


I have since realised that leaving the mouth as an empty hole looks strange, so I created a tongue and teeth. To add further detail to the tongue I extruded the central edge inwards to create the natural crease.

The next goal is to unwrap the UVs for texturing in Adobe Photoshop. I would like to experiment with fur as opposed to a flat texture, but this may take too long to render in time to meet the set deadline.

1 January 2015

Evolution of Remy


The first and final design.


This assignment requires me to create a character that can be modelled and textured using Autodesk Maya and Mudbox. I used elements from the original drawing to create multiple sketches of how the character might look, and then decided upon a final design that would be suitable for the task at hand. I could then create drawings of him from the front and side to be used as templates for modelling in Maya.

Through the rough shaping stage I strictly worked to my image planes, however I decided to make the legs longer and his head smaller. The suit will be modelled onto the character, but the hat is currently a separate model that can be removed from his head. As the character is somwhat simplistic, I was able to complete this stage fairly quickly before importing it into Mudbox for the rough sculpt.
Stage 1: Rough shaping in Autodesk Maya

Stage 2: Rough sculpt in Autodesk Mudbox
Although I have previously used Maya for modelling in college, I have had little experience with Mudbox. The result of the rough sculpt is somewhat sloppy, however it was my first attempt at using a graphic tablet. The model will now be imported back to Maya for retopology.

5 October 2014

The bloggin' begins...

My journey began in childhood, where I first discovered my love for video games. Not only do I enjoy playing games, but I consider them to be an art form - a gateway almost, allowing a person to visually explore another's imagination. I was fascinated by the designs that went into the creation of both characters and environments. 

Games I particularly enjoyed include 'Spyro the Dragon', 'Hotel Dusk' and 'Heavy Rain'. Heavy Rain was created by Quantic Dream - a French video game developing company who create realistic graphics using actors and techniques involving motion capture. The final results of the creating process are impeccable, as the character models are borderline identical to their real-life actor. 

In 2012 I began my studies of Animation for Film and Games at St. Austell College. I excelled in many areas of the course, working vigorously in software such as Autodesk Maya, Adobe Flash and Adobe Photoshop. The course taught me many important skills, such as how to create storyboards to a good standard, how to analyse existing video and photographic advertisements and how to visually present ideas. 

During my college course, I had much experience in working as a team - which was especially effective when designing TV idents. The assignment required me to work in a group of 2-3 people to create a 30-second ident for the fictional game-reviewing channel 'Game Hedz'. Within the project, my colleague was responsible for the environment design, whilst I created the character - which was modelled, rigged, textured and animated in Autodesk Maya.

A render from the final TV ident production.

I am currently studying Animation and Visual Effects at Falmouth University, where I am hoping to develop my skills further in order to achieve the career I hope for.