The animation is a lot closer to the desired movement of the character, but I still need to animate her facial expressions. The above animatic is made up of both shots 6 and 8 - shot 5 being a close up of the locket in her hands. It was requested that I make it obvious where the shot should cut, so the animation jumps to the start of shot 8.

Showing posts with label Animation. Show all posts
Showing posts with label Animation. Show all posts
18 March 2016
Working on WingSpan
The key frames for shot 6 have been tweaked in both the dope sheet and graph editor and shot 8 has been blocked:
The animation is a lot closer to the desired movement of the character, but I still need to animate her facial expressions. The above animatic is made up of both shots 6 and 8 - shot 5 being a close up of the locket in her hands. It was requested that I make it obvious where the shot should cut, so the animation jumps to the start of shot 8.
The animation is a lot closer to the desired movement of the character, but I still need to animate her facial expressions. The above animatic is made up of both shots 6 and 8 - shot 5 being a close up of the locket in her hands. It was requested that I make it obvious where the shot should cut, so the animation jumps to the start of shot 8.

4 March 2016
Wing Span begins
The animation stage has finally begun for the crew project film 'WingSpan'. I've been given shots 6 and 8 to work from as they are fairly similar in terms of action and composition.
This is the first stage of animation for shot 6, which gives a rough idea of Amelia's timing and movement.
This is the first stage of animation for shot 6, which gives a rough idea of Amelia's timing and movement.
20 February 2015
Skipping in Celaction
For our motion studies module we were introduced to Celaction to use as an alternative to Adobe Flash. A coloured jpeg drawing of Remy was put into Photoshop so that his body could be broken down into layers, which were each named accordingly.
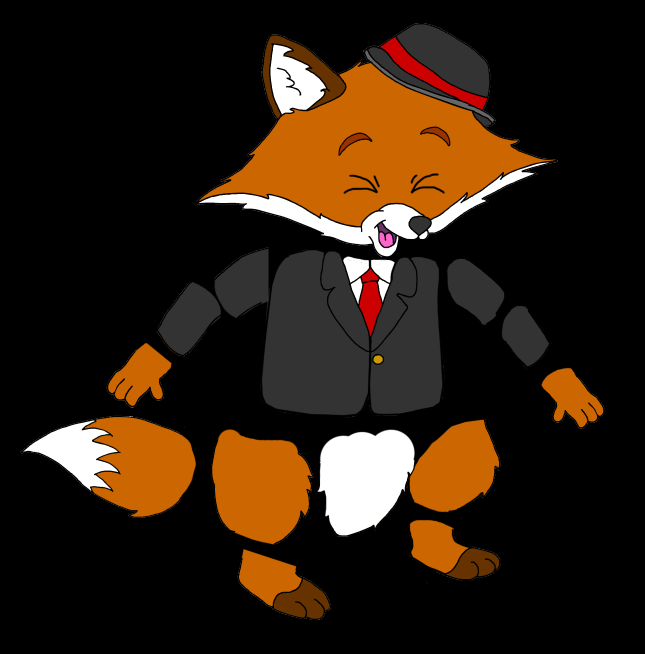 |
| Elements of the body taken apart in Photoshop. |
This Photoshop file could then be imported to the pool in Celaction so that a hierarchy could be created to link the joints, which were then anchored to move at their appropriate pivot points. As inverse kinematics don't work well in 2D animation, the root was based in the character's pelvis. These layers were also maneuvered in the Actor Display menu to ensure parts of the body were not hidden.
 |
| The components ordered in an accurate hierarchy. |
 |
| The two eye shapes: open and blinking. |
When imported, Remy was much larger that the designated stage, so the camera size was increased. The required key poses and breakdowns were positioned in the dope sheet and an ease in/out algoraithm inserted the inbetween frames.
23 January 2015
First 3D Showreel
Taking Monty for a Walk
This is Monty - a fully rigged character who somewhat resembles Mike Wazowski. The rigged model was given to us to animate in Autodesk Maya, which allowed the movement of his legs along with bodily squashing. The task was to create two different walk animations: a walk cycle and straight ahead walk.
As it sounded to be the more complex of the two I decided to animate the cycle first, but found it easier than expected. For the straight ahead, I used the 'Animator's Survival Kit' to help time when he should bounce.
As it sounded to be the more complex of the two I decided to animate the cycle first, but found it easier than expected. For the straight ahead, I used the 'Animator's Survival Kit' to help time when he should bounce.
Playing with Tails
Tails has be reused for this animation. This time I created two different obstacles for him to interact with: a basic stool and a small fire pit. This allowed me to experiment with fire dynamics which appear to be pretty complex due to the large amount of modifications that can be made.
In the playblast the fire appears as a green gas, but when rendered using Mental Ray the final image is much more appealing.
 |
Moving Forward
22 January 2015
Diving with Finn
This animation was the most demanding so far and, therefore, the most challenging. The task at hand was to design a character and draw a turnaround sheet. The same character would then be animated to jump onto a diving board and into a pool of water - with splash!
This is Finn.
Although there were many aspects to consider during the animating process, (such as squash and stretch, the board springing and timing the splash) I thoroughly enjoyed bringing Finn to life.
This is Finn.
 |
| Say hi, Finn! |
8 January 2015
Flash and Smoke
This task was easily the most fun out of the assignments so far - perhaps because I have an interest in visual effects. The objective was to create a smoke cycle in Adobe Flash.
I created the smoke on two separate layers which was significantly useful when it came to calculating the timing for each puff of smoke. I am pleased with the flow of the animation itself, but dislike its over-all appearance. The initial plan was to fill the scene with different cycles including a dripping tap and flashes of lightning in the window, however I will probably create these as individual animations.
Since I now have a graphic tablet, I figured that I should redesign the animation. It made sense for the kettle to be much larger to fill the frame so that the animation can be seen clearly. The art style is still very simplistic, but I feel that the animation works well regardless.
30 December 2014
Weight with Bony
This is Bony. The goal is to animate him lifting and pushing objects in Autodesk Maya using constraints.
Although I managed to create the animations, I feel that I will need to revisit and practice working with constraints to gain a better understanding of how they work.
28 December 2014
How to do the juggles, man?
In my second attempt I fixed the wobbling motion, although this also required all of the balls on each layer to be adjusted.
10 December 2014
Rock Lift
2 December 2014
Bouncing with Squirrels
In this animation, the jelly bean-like shape is supposed to jump with arcs similar to the bouncing ball task, although this time a tail should follow through. I found this to be the most difficult task so far. I especially struggled with making the tail move naturally as opposed to looking stiff and robotic.
30 November 2014
Elephant and the Bicycle
I can honestly say that I had low expectations for this film. The story is introduced with members of the public littering the street, which left me with the assumption that this would be another typical 'save the environment' campaign video. However, I was pleasantly surprised by the appearance of a large, street-sweeping elephant.
Although the character does not speak throughout, I found myself quickly gaining a small attachment to the elephant as I joined him on his journey throughout the day - especially because of his many small quirks. One moment in particular that stuck with me is when he eats his bunches of bananas - popping them open one by one with his trunk. Another was when he produced rain after drinking water, showering down on people walking by with umbrellas.
The animation style consists of multiple hand-painted shapes which were then combined to create objects. The animation itself was very fluent - particularly in the trunk which flowed with natural arcs. The environments were not always realistic (as can be seen by the slanted houses in the image above) but it compliment's the film's child-targeted storyline well. I also found the sound to be an effective element of the film - creating a bigger impact for the character's movements. For example, when he sweeps the street is accompanied by a sharp brushing sound.
As the story continues, we watch the elephant grow excited at the thought of buying the bicycle - working hard each day to save his small wage towards the £9999 price tag. There was one shot in particular which truly emphasised how hard he was working, where the animator overlapped multiple images of the elephant sweeping in different streets simultaneously.
It is almost heartbreaking to watch when he finally comes to buy the bike, realising just how tiny it is. The elephant then retracts himself from society - hiding away in his house for a long period of time. Equally upsetting is the realisation that the people who live around him do not care that he is upset or gone - only noticing his disappearance as the trash builds up to the point of inconvenience.
Upon realising that avoiding his duties effects others, he quickly grabs a sack and begins to clean the streets once again - also discarding the beloved bike. However, the tone of the film quickly changes when he meets a young girl doodling a bicycle into the side of the pavement using chalk. He performs the heartwarming act of giving the bicycle to the girl who desires one. The film is topped off when the small girl runs to hug the gigantic creature and befriends him.
The simplistic animation and lack of dialogue compliment each other well for an entertaining and easy-to-follow narrative for an audience of any language. The heartwarming story remained engaging throughout, triggering both sadness and happiness whilst appealing to its young target audience successfully. The Elephant and the Bicycle quickly exceeded all expectations and was a worth winner of the Bradford Animation Festival Award 2014.
5 November 2014
Tweening: Hand Turning
We were given the first and last frames of this animation and instructed to draw the relevant tweens using a light box.
After combining the frames using Dragonframe, I found that the animation does not run as smoothly as it could. I much prefer animating in Adobe Flash as the frames can be played instantly, meaning that changes to the animation can be made sooner.
30 October 2014
Anticipation for Jumping
The second principle of animation is anticipation, which is used to show the preparation for an action. All important actions should have anticipation as it is arguably the most important part of an action because it directs the viewer's attention to the movement and suggests what action is going to occur.
Keeping the squash and stretch principle in mind, I have created a simplistic character in Adobe Flash which has been animated to jump.
I found that the 'onion skin' tool was particularly helpful as it allowed me to animate the character straight ahead - creating a good level of fluidity. The use of colour also allowed me to control the body's volume throughout the animation. I also played different music and sound effects alongside my animation to experiment with the impact that sound can have. On the other hand, I found it difficult to maintain a consistent line thickness due to Flash's smoothing.
To overcome this I removed all outlines, leaving the character's motion unchanged.
Keeping the squash and stretch principle in mind, I have created a simplistic character in Adobe Flash which has been animated to jump.
I found that the 'onion skin' tool was particularly helpful as it allowed me to animate the character straight ahead - creating a good level of fluidity. The use of colour also allowed me to control the body's volume throughout the animation. I also played different music and sound effects alongside my animation to experiment with the impact that sound can have. On the other hand, I found it difficult to maintain a consistent line thickness due to Flash's smoothing.
To overcome this I removed all outlines, leaving the character's motion unchanged.
16 October 2014
Squash and Stretch
The twelve principles of animation are essential techniques for animating in both 2D and 3D. The first principle, squash and stretch, involves the exaggeration of a character's body to create the illusion of weight and volume as it moves. Squash generally shows force, impact or anticipation, whilst stretch indicates acceleration or velocity.
To demonstrate, I was set the task of animating a bouncing ball. This required each frame to be individually drawn using a light box and animation pegs to assure that the animation flowed.
Throughout this process it was important to consider not only the volume of my ball, but that each drawing followed an arced motion path. It was somewhat difficult to judge the distance between each drawing as the velocity increased and decreased, however I upon watching the final video I feel that this is not too much of an issue.
I also attempted this exercise in Autodesk Maya using a polygon sphere with a rig that allowed the ball to move, squash and stretch.
I found this method to be much easier and quicker as the rig controlled the volume of the ball when squashing and stretching. The software also created the in-between frames, meaning that I avoided the earlier issue of judging distance.
I also used Maya to complete a similar exercise where the ball needed to accelerate before coming to a sudden halt. This time the character has a tail, which follows through as the ball stops. This task was the easiest of the three, which is most probably due to the linear motion path.
To further experiment with the principle of squash and stretch, I will later animate the same character to maneuver between various obstacles.
To demonstrate, I was set the task of animating a bouncing ball. This required each frame to be individually drawn using a light box and animation pegs to assure that the animation flowed.
I also attempted this exercise in Autodesk Maya using a polygon sphere with a rig that allowed the ball to move, squash and stretch.
I found this method to be much easier and quicker as the rig controlled the volume of the ball when squashing and stretching. The software also created the in-between frames, meaning that I avoided the earlier issue of judging distance.
I also used Maya to complete a similar exercise where the ball needed to accelerate before coming to a sudden halt. This time the character has a tail, which follows through as the ball stops. This task was the easiest of the three, which is most probably due to the linear motion path.
To further experiment with the principle of squash and stretch, I will later animate the same character to maneuver between various obstacles.
5 October 2014
The bloggin' begins...
My journey began in childhood, where I first discovered my love for video games. Not only do I enjoy playing games, but I consider them to be an art form - a gateway almost, allowing a person to visually explore another's imagination. I was fascinated by the designs that went into the creation of both characters and environments.
Games I particularly enjoyed include 'Spyro the Dragon', 'Hotel Dusk' and 'Heavy Rain'. Heavy Rain was created by Quantic Dream - a French video game developing company who create realistic graphics using actors and techniques involving motion capture. The final results of the creating process are impeccable, as the character models are borderline identical to their real-life actor.
In 2012 I began my studies of Animation for Film and Games at St. Austell College. I excelled in many areas of the course, working vigorously in software such as Autodesk Maya, Adobe Flash and Adobe Photoshop. The course taught me many important skills, such as how to create storyboards to a good standard, how to analyse existing video and photographic advertisements and how to visually present ideas.
During my college course, I had much experience in working as a team - which was especially effective when designing TV idents. The assignment required me to work in a group of 2-3 people to create a 30-second ident for the fictional game-reviewing channel 'Game Hedz'. Within the project, my colleague was responsible for the environment design, whilst I created the character - which was modelled, rigged, textured and animated in Autodesk Maya.
I am currently studying Animation and Visual Effects at Falmouth University, where I am hoping to develop my skills further in order to achieve the career I hope for.
Games I particularly enjoyed include 'Spyro the Dragon', 'Hotel Dusk' and 'Heavy Rain'. Heavy Rain was created by Quantic Dream - a French video game developing company who create realistic graphics using actors and techniques involving motion capture. The final results of the creating process are impeccable, as the character models are borderline identical to their real-life actor.
In 2012 I began my studies of Animation for Film and Games at St. Austell College. I excelled in many areas of the course, working vigorously in software such as Autodesk Maya, Adobe Flash and Adobe Photoshop. The course taught me many important skills, such as how to create storyboards to a good standard, how to analyse existing video and photographic advertisements and how to visually present ideas.
During my college course, I had much experience in working as a team - which was especially effective when designing TV idents. The assignment required me to work in a group of 2-3 people to create a 30-second ident for the fictional game-reviewing channel 'Game Hedz'. Within the project, my colleague was responsible for the environment design, whilst I created the character - which was modelled, rigged, textured and animated in Autodesk Maya.
 |
| A render from the final TV ident production. |
I am currently studying Animation and Visual Effects at Falmouth University, where I am hoping to develop my skills further in order to achieve the career I hope for.
Subscribe to:
Posts (Atom)