29 December 2015

Storyboarding for the BBC's Listening Project

My team consists of Alice Seatherton, Kayleigh George, Krissy Ewins and Megan Ryder. We decided to work on the BBC's listening project for our live brief assignment, which requires us to choose a pre-recorded conversation and create an accompanying animation. The conversion we chose takes place between father and son, Roland and Laurie, who are discussing Lego.

We started the project by having group meetings early on to solidify our idea: keep the animation non-linear, with random objects and characters entering and leaving the shot to accompany the audio. 

The colour palette will be made up of multiple pastel colours with the art style looking hand-drawn, as if created by crayons. We first analysed the script to establish everything that would need to be designed or considered later in the creative process. Alice decided to break the script into coloured segments, which were then assigned to each of us to work on throughout the pre-production process, including part of the storyboard. Below is my three-part storyboard:


19 December 2015

Shooting for Invisible Effects

The Christmas break has given me plenty of time to shoot the footage for my visual effects coursework. However, the winter weather has left me with little choice but to compromise and break away from the shots I had previously planned. I still wanted to create a sky replacement, but the little amount of sunshine made it difficult for me to create silhouette shots.


I instead carried out a sky replacement shot on a Cornish beach and used various in-software tools to increase the brightness and saturation to give the appearance of a sunny day. I created a second moodboard to show the sense of vibrancy and the camera angle I want to use: the shoreline vertically cutting across the shot with an land enclosing the background.


Above shows screengrabs from a few of the test shots I created. Despite having a strong idea of the way I wanted this footage to look, I also created a few experimental shots, such as the top-left where I climbed across rock pools. Regardless, I still went ahead filmed the final shot as originally planned.

I decided to use this edit to push my initiative to explore Adobe After Effects and see if I could work out how to replace a sky without using any tutorials: the process was much easier than anticipated and use of layers allowed me to individually work on each aspect of the shot, breaking apart the environment into background, foreground, mid-ground and sky.


2 December 2015

Rigging Masterclass: Day Three


Hand after rigging and weight painting


Setting a driven key for the IK/FK wrist


The outliner shows the finger after joints and offset controls constrained, and controls parented.


Curl attribute added to the finger. Connection editor established connection: can now freely curl finger in the Z axis, and also move joints individually. Using the same method, I connected the wrist controller and finger control to allow rotation of the index finger in the Y axis.


I think it broke...


Baring in mind this is my first attempt at rigging, this turned out pretty well.

1 December 2015

Rigging Masterclass: Day Two

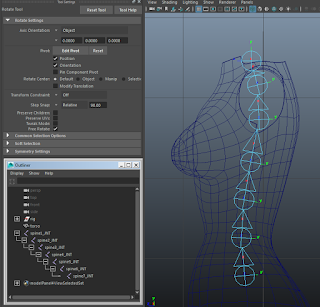
Continuing with the scene file from yesterday's session, I spent today learning how to rig the spine. Although a lot of the technique involved was similar to rigging of the leg, a few different methods and tools have been used.


Step Snap
After the spine joints were created, each individual joint was rotated using step snap to align the orients to ensure that the rotation was synchronised.


Advanced Twist Controls

I also used the advanced twist control, which initially appeared to break the model, but was quick to fix the issue with a few alterations in the attribute editor.


Advanced Twist Controls (Fix)


A controller to control the object's centre-of-gravity was created, which was parented to the hip and rib control offset groups.


The final spine rig
In MEL: arclen -ch true "spine_CRV" was used to find the length of a curve, followed by 
createNode multipleDivide -n spineScale_MDV along with a few connections in the Connection Editor to enable a stretchy spine.

Below is the final outliner display for spine:


I then began working on the arm, which included rigging, creating an IK and FK handle and creating attributes.


Adding the FK/IK attribute

In tomorrow's session, we will be continuing to rig the arm.

30 November 2015

Rigging Masterclass: Day One

Today I started the 3-day rigging masterclass with Karen Halliwell. During today's session I followed her tutorial of how to create a reverse foot rig, weight painting and how to organise the outliner efficiently.

Above shows the final leg rig, which includes a knee control, multiple feet controls (including pivot points) and a global control.


The final organised Outliner for the rigged leg.

18 November 2015

Shooting for Colour


Above shows the very simple set up I used: the Black Magic Pocket Cinema Camera on a tripod. I didn't manage to find a red hood in time, so I substituted with an apple and lipstick for the shot. This was the only footage from the whole shoot which came out as intended:


This is how the footage looked before being taken into any editing software:


I decided to create the effect in After Effects as it seemed like a fairly simple process, which required me to duplicate the footage and alter both layers individually. As the leaves were orange, I had to rotoscope the apple to ensure that the background became desaturated.


After altering the brightness and contrast of the shot, I altered the hue of the apple and lips in an attempt to make them more noticeably red. This works fairly well and gave me an understanding of how to create the effect, but would look a lot more striking if I had used red clothing to become the focus point.


14 November 2015

An Improvised Compromise...

It would be my luck that the very weekend I finally have the Black Magic Pocket Camera that the weather has turned extremely stormy. As all of my shots need to be filmed outdoors, this means that I will have to compromise and either change my shots or film at a later date. After trying to work out a way that I could film indoors instead, I was inspired by a scene from South Park:


I could film the back plate of a city - perhaps with a few people running in fear -  and film the guinea pig against a green screen to scale them up to be gigantic beasts. This could be a possible solution for me, because I am the proud owner of 8 guinea pigs and a few of them would be very co-operative for cucumber. 

After discussing this idea with a close friend, the idea has snowballed to what may potentially become a short-term project in itself. It was suggested that I could recreate this renowned Jurassic Park scene:


If I were to create this scene, I would probably cut out a lot of shots to bring the duration down to approximately 30-seconds due to time and cost restraints. Although I may not even go ahead with this idea, I used one of my guinea pigs as a model to create a logo for the potential spoof:


Online I found the actual shop that South Park used for the dinosaur costumes, however due to the time it would take to make a costume, international postage and the Christmas quickly arriving, they would not arrive until next year, so perhaps this idea is for another time.


12 November 2015

5 Ways to Become an Animator

  1. Improve what you're terrible at.
  2. Don't ignore the importance of your network.
  3. Don't let procrastination and perfectionism paralyze you.
  4. Make an exciting demo reel.
  5. Don't depend purely on being a student at a good university on finding me a job.

Mock-Ups for Visual Effects

This afternoon I managed to book out the Black Magic Pocket Cinema Camera so I can shoot a range of desired test shots. In preparation, I have created a mock-up for each shot:


For scale, I want to create the illusion of a tiny person walking through grass. I may need to apply theory to make the shot more believable, such as making a small character move quicker. It may also be a good idea to select a relevant costume, such as a fairy or pixie, however this depends on budget.


I took photographs of multiple types of grass from different angles to see which worked best, which was extremely helpful when deciding which to use for my mock-up and will hopefully give me a rough idea of the camera angle and composition when it comes to shooting. When creating the image in Photoshop, I found it a lot more believable if the person was shown to be coming out from behind a blade of grass as opposed to standing in front of it, which appeared to look like a flat image.


I'd like to have a lot of control over the colour shot, so an effect inspired by the film Sin City felt appropriate. Both images were taken from Google images due to time restrictions and lack of props (I will need to find a red hood or coat). This shot should be fairly easy to create as I live directly across the road from a wooded area, which will be an ideal location - especially if I am lucky enough to encounter fog on a day in which I am filming.

For invisible shots I wanted to film the silhouette of a person in motion and then change the sky, however this may be difficult with the incoming winter weather, so stock footage may become necessary. I have managed to create a mock-up using an old photograph I had taken of some trees at dusk, but the sunrise was taken from Google images. I found that I clipped far too much detail from the tree branches, so I'll be careful of this when it comes to editing footage in visual effects software.


10 November 2015

Filming in Action

I've lived in Cornwall for the entirety of my life and have been lucky enough to live near Charlestown Harbour. Throughout the years, it has been used in many major productions including Alice in Wonderland, Dr. Who and Saving Private Ryan. The harbour was recently purchased by Atlantic Production Ltd, who are rumoured to have the intention of increasing the amount of film work carried out on location.


Over the weekend, Take the Shot Productions were working on a Canadian television show 'Frontierstarring Alun Armstrong. The set up and process was really interesting to see, so it will be exciting to see what the future holds.

8 November 2015

Moodboarding for Visual Effects

The 11 Second Club had a significantly closer deadline and, therefore, gained priority over my other assignments. Now that it has been completed, I can knuckle down on the other modules, which include post-production, animation technologies and the crew project.

In post-production we are focusing on visual effects and will be required to create three different shots to show scale, colour and invisible effects.


Scale: The purpose of this shot is to manipulate the size of an element - whether bigger or smaller. I have decided to attempt the illusion of a tiny person walking through grass.


Colour: For colour, I want to have a lot of control over this shot in terms of visuals. The focus point will be wearing a red cloak within a wooded area - preferably on a foggy day. The background will be low in saturation.


Invisible effects: 
After watching a breakdown reel for 'The Walking Dead' I was inspired to attempt a shot of a burning building, but it has been suggested that this type of edit is closer to a seamless effect.


Instead, I shall be attempting to capture the silhouette of a person in motion and then changing the sky to create a different atmosphere.

The next steps for me to carry out will be to create a mock up for each shot to help establish any problems I might run in to, scout for a location and complete a recce for the area.

5 November 2015

11 Seconds to Completion

I intended to post regular updates on the progress of my animation for the 11 Second Club assignment, but found that I was constantly making small changes every time I worked on it, so a post at the end of the process would suffice. 


Honestly, there are changes that I would still like to make to the animation, but I was very conscious of the upcoming deadline and wanted to be able render and submit the footage on time. 

I find that the animation of both Rocket and Captain America is pretty loose and needs to be altered in a few areas. The lip sync also needs work, but I left that task till the very end.


Overall, I feel like my animation in Maya has improved since last year and this task has helped me in finding other areas which need improving, such as lighting and texturing. I'd also like to learn how to rig my own models so I could try using those for future work.

20 October 2015

Inspiration/Motivation

As a little boost of inspiration I watched this breakdown video this morning, which features some tips for 3D animation:


15 October 2015

11 Seconds More Progress

Over the last few days I prioritised the feedback which was given to me during the last lecture as key points to improve on:


An environment has been created, although it is VERY simplistic and is yet to be textured. But it hopefully gives off a sense of the space between the two characters.

I've added a few more blocked steps to Rocket's animation and although I have continued to make Captain America step backwards - as suggested - I have not completely finished blocking his movement. 

There's still obvious progress to be made to the character's performance, but I am very positive that this will be completed on time.

13 October 2015

11 Seconds of Progress

Over the last few days, I finally figured out what I want to do for my 11 Second Club animation. It is important for the performance of my characters to be relatable, so I started by filming myself acting out the situation in various ways until I found a method which worked for me.

After experimenting with the Rocket Raccoon and Captain America rigs that I found on the forums, I have started to block out the animation (bare in mind that I have not yet focused on blocking Captain's movement).


I presented my progress to my teachers during today's lecture, which resulted in some feedback for improvements:
  • Build a location. A basic environment with simple flooring should work fine.
  • Block out Captain America. He should continue to step backwards, even if Rocket stops moving forward.
  • Alter Rocket's performance. When saying "kindness", Rocket's body should turn to break how linear the shot is.
  • Improve overall performance. Add small movements (e.g. moving Rocket's ears and tail
  • Avoid using unmotivated cuts. A variation of shots are not required as they will probably not add to the performance.

6 October 2015

Change of Plan...

Being so close to the end of September, I decided to hold off for the 11 Second Club's October competition. Unfortunately, both the September and October competitions provided us with audio tracks from two famous films, leaving little to the imagination. We have now been offered an alternative audio file with the following transcript: 

Voice One: Voice One: "You stole it! I..."
Voice Two: "I thought you put it there!"
Voice One: "Why would I put it there?!?"
Voice Two: "Kindness?"
Voice One: "Kindness?! You stole it! He stole it!"


I am primarily fond of animating in 3D, so my first task is to find appropriate rigs to use: through the 11 Second Club forums, I found a bunch of rigs for Autodesk Maya that are free-to-use for personal and educational use.


22 September 2015

11 Seconds of Brainstorming

Over the next few weeks I will be working on a piece of animation for the 11 Second Club's September transcript:


Voice 1: This is, ah, this is heavy duty, Doc! This is great! Does it run on like regular unleaded gasoline?
Voice 2: Unfortunately, no. It requires something with a little more kick... Plutonium!
Voice 1: Ah, Plutonium! Ah, wait, are you telling me this sucker is nuclear?!

I decided to brainstorm my initial ideas to create a rough outline of how I want the scene to look. As I am going to create the animation in Autodesk Maya, I have also looked at a few work-in-progress pieces on YouTube: 


I am yet to create a set of thumbnails which will allow me to start working on the animatic. 


13 September 2015

Xenomorph Completion

After approximately 30 hours, the first drawing is finally complete. If I were to redraw the image, there are a lot of things I would do differently from the original attempt (mostly referring to my shading technique), which I consider to be a positive outcome so early into the project. 


One down, 25 drawings to go. For the letter B, I am torn between drawing the Batmobile or a bearded dragon.

29 August 2015

Xenomorph Progression


Admittedly I thought I'd have made a lot more progress over the last week, but I've been a lot busier than anticipated. However, I have tried to make some time each day to work on the drawing.

22 August 2015

Steal Like An Artist

Upon completing university for the Summer break, my strict deadlines have been replaced with complete and unrestricted creative freedom. This would usually fill me with nothing but excitement and determination to express my imagination. However, I have instead suffered with a large (and definitely unwelcome) creative block.

I felt lazy and frustratingly unproductive until I stumbled across the work of author and artist, Austin Kleon, who focuses on creativity. His book, 'Steal Like An Artist', featured a quote that I strongly related to: 
"Nothing is more paralyzing than the idea of limitless possibilities".

In fact, I found the entirety of the book completely relatable and extremely motivational. It was the drive I really needed to get back into the swing of things, so I would highly recommend it as a good read for anyone who needs a push in the right direction.


For the entirety of the first year of university, I viewed this blog as a place to post the work that I considered 'good'. However I am now beginning to view the platform more like a journal where I can share my work along with any influences or inspirations I may have. I'm hoping that changing the way I post content will allow me to see myself progressing.

To make up for the lack of posts, I have set my self a simple A-Z project, which will require me to create a drawing that corresponds to each letter in alphabetical order. To kick off, here's the basic outline of the Xenomorph from 'Alien' that I'll be working on over the following week.


20 May 2015

Title Sequence: Complete!

I have finally finished the majority of the work for this semester, with just one assignment left to complete and submit. The group pulled together over the last week and the title sequence for Samson is finally complete:


19 May 2015

Working with Art Styles


The original piece by Dean Dodrill.


The original piece by Artur Sadlos.


14 May 2015

Ropey Animation


Although the group has made a lot of progress over the last week, this is the most recent version of the animatic that I currently possess. My job for this week is is to animate is the rope segment in Adobe Flash.


This was the initial test that was created to give me a general idea of the timing and composition. 


I then filled in the shape, which gave me a better idea of how well the animation really worked. I also altered the cutting animation, although further adjustments are yet to be made.


This is where I my current stage in the process: I have began to roughly shape the rope and hair to create the morphing effect, although the further shaping needs to be made.

8 May 2015

Modelling Progression

With the end of this semester edging closer, I have been working hard on the remaining assignments; background painting, motion studies, the sound project, camera projection mapping and the group collaboration to create a title sequence.

Between working on paintings, I have taken some time to practice modelling in Autodesk Maya. I found a range of blueprints online for various game, film and television characters. I decided to model a Dalek as the design didn't look too complex. (Famous last words...)


Although incomplete, the model looks pretty good so far. I will probably work on this Dalek at a later date as I enjoyed modelling it.

7 May 2015

The Art of Artur Sadlos

For the artist research task of the background project, I am required to source two artists whom work in a naturalistic style that will inspire my final layouts. I have decided to recreate one of Dean Dodrill's environments from 'Dust: An Elysian Tail' (refer to previous blog post). My second chosen artist is Artur Sadlos, whom creates backgrounds in a range of styles.


My favourite pieces of his work are the conceptual designs created for the zombie game 'Dead Island'.